September 23, 2010
Fitting The Stock.
By Reid Coffield
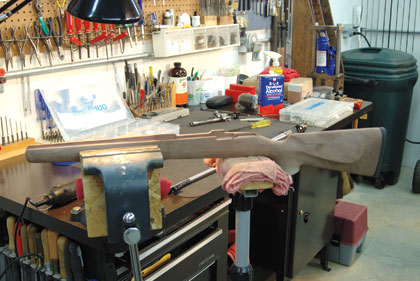 When working on the Boyd's stock, the author used a padded vise for the fore-end and a free-standing support for the action area. |
With the metal work just about complete, I'm ready to fit the Mauser barreled action to my Boyd's walnut stock. The stock has been inletted by the manufacturer and will require very little additional work. My initial inspection indicated that a limited amount of wood would have to be removed around the action; however, most of the work would be in the barrel channel.
Keep in mind that there are a gazillion different barrel contours from goodness knows how many different barrel manufacturers. It's just not possible or practical for a stock manufacturer like Boyd's, or anyone else for that matter, to provide a perfectly inletted barrel channel for every possible barrel contour and action combination. Consequently, you should never be surprised if you have to open up a barrel channel to some degree.
Advertisement
Actually, it's not all that difficult. In fact, it's one of the easiest inletting tasks you'll face. All you'll need are a few small gouges and scrapers along with some inletting black and a bit of patience.
Inletting
The first step is to strip the receiver of the bolt, trigger, bottom metal, trigger guard, and in this case, the receiver sight. After that, a small brush is used to apply inletting black to the bottom half of the receiver and the barrel. Inletting black is a thin paste-like material that will transfer to the wood when the coated metal comes into contact with the stock. Those contact points will show a trace of inletting black. You know exactly where the wood is hitting metal. There's no guessing to it. If there's no black, there's no contact. The basic idea is to remove wood that contacts the barreled action and prevents it from fully seating in the stock.
Advertisement
 The author used Forster inletting guide screws to make sure the barreled action was always properly positioned when placing it in the stock. |
Don't go crazy and cut too much. Take out as little as possible after each impression with the black-coated metal. It's a lot better to spend extra time scraping away wood rather than make heavy cuts with a gouge or Dremel tool and end up with unsightly or large gaps between the wood and metal.
My favorite tool for this work is a scraper. You can make your own in any shape you need with nothing more than a file or a grinder. Broken hacksaw blades are ideal for small scrapers. Just grind 'em to the shapes and sizes you need. The secret to a good scraper is to leave the tiny burr you get on the bottom edge of a piece of metal when you file or grind it. That burr actually cuts or scrapes away the wood.
Bedding
Once the barreled action was fully seated in the stock, the next step was to apply the synthetic bedding. I'm a strong believer in synthetic bedding because of its multiple benefits. Most importantly it ensures that the fit between wood and metal is 100 percent perfect. To get a similar fit between wood and metal without bedding requires exceptional skill that few of us have. Synthetic bedding makes it possible for folks with average ability to get superior results. Synthetic bedding is also an effective sealer for the wood. With a coating of bedding there is little or no chance that oil or grease will penetrate and weaken the wood. And synthetic bedding will strengthen the wood and help to prevent recoil-related damage.
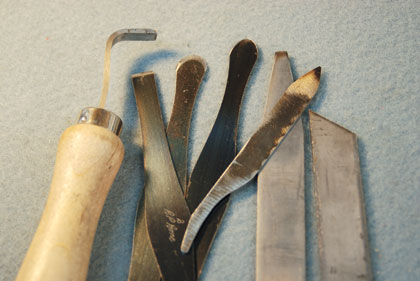 A variety of commercial and homemade scrapers were used for the final removal of excess wood. |
There are a variety of commercial bedding products currently available. As far as I can tell all of them will do a good job. I prefer Brownells Acraglas Gel for standard bedding jobs and Brownells Steelbed for situations where I need a super-tough bedding surface. With that said, it's not so much which product you use, but how you use it.
The most important thing to keep in mind is to read and follow the manufacturer's directions precisely when mixing the bedding components. Never guess or estimate the amount of hardener or resin you use. Always measure your components.
Don't skimp on the release agent when applying it to your metal components, and always coat more of the metal surface than you think necessary. Bedding has a mysterious way of getting onto parts you would think would never be anywhere near the stuff. Also be sure to fill pin and screw holes, slots, and other machined openings with modeling clay before applying the release agent. The clay will keep the cured bedding from locking the barreled action into the stock.
Finally, you almost always have to remove some wood from the stock to allow space for the bedding material. This space doesn't have to be a lot, but it's gotta be there. At the same time, don't take out so much wood that your barreled action is not supported and positioned properly. More often than not, I'm able to take out the wood with nothing more than a small round burr or cutter in my Dremel tool.
 The author used a Dremel hand grinder along with a number of carbide cutters to remove wood where the synthetic bedding would be applied. Note the grooves that were cut into the stock in front of and behind the recoil lug seat. |
As for the placement of the synthetic bedding, I like to have bedding under the chamber area of the barrel, from the recoil lug back to the magazine well, and under the rear tang of the receiver. There're lots of different theories as to where you should or should not place the bedding. Don't worry too much about the "perfect" placement of the bedding because you can always cut it out and redo it if you're not happy with the results.
The hardest part of bedding a stock for me is coloring the bedding so that it matches the wood. I have to admit that I often tend to make the color of the bedding too light. For the most part I
believe it's best to have the bedding darker than the wood. You can always stain the wood to a slightly darker shade to match the bedding. On the other hand, once the bedding is cured, it's pretty much impossible to change the color. So€¦if you have bedding that's visible, make it dark. That'll save a lot of hassles and make your project look a lot nicer in the end.
After the bedding was applied, I carefully removed any excess that had been squeezed out from between the wood and metal. It's best to clean off as much excess as possible while the bedding is still soft. I then let it cure for 24 hours before removing the barreled action. If I have any voids or spots where there were air bubbles, I clean the bedding with alcohol to remove any trace of release agent and apply just enough fresh bedding to fill the voids. I know this is just cosmetic, but nothing looks worse to me than Swiss cheese bedding filled with gaps and holes.
That about does it. The next time we get together we'll finish the stock. Until then, good luck and good gunsmithing!
 The author prefers Brownells Acraglas Gel, a nylon-based bedding product, for bedding a stock. |
