September 23, 2010
By Reid Coffield
 Using a half-round wood rasp, Reid carefully shaped the sawhandle stock. Note the flat steel grip cap. |
There are probably as many different reasons for putting together a muzzleloading kit gun as there are folks doing it. For a long time I did it because I had to. I ran a small gunsmith shop and saw more than a few partially completed and generally screwed up kits and kit guns. Typically, the owner would bring in a bag of parts and have my partner or me finish the gun for him. Some folks just overestimated their mechanical ability or their interest in the task or the complexity of the kit. For any number of reasons, they ran into trouble and needed help.
Now don't get me wrong, I was always happy to help my customers and darn glad to get the work. Those jobs helped to keep bacon and beans on the table for my family. The problem was that more often than not, these were just not interesting guns, or the kits were of pretty low quality. Back in the 1970s and '80s when I had my shop, there were a lot of really poor quality muzzleloading kit guns on the market. Not only were some of these kits made of poor quality materials, they were often darn hard to put together, and nothing seemed to fit properly.
Advertisement
That has changed a lot.
There aren't all that many kits still available, and the ones I've seen are pretty darn good. The folks at Traditions Performance Firearms offer a good variety of kits, and last year I put together one of the firm's muzzleloading rifles. I ended up with a very nice percussion half-stock rifle that shoots really well.
Advertisement
Because I enjoyed that experience so much, I decided to try it again, but this time I wanted to put together a handgun. I ordered a Trapper Pistol Kit, which is a .50-caliber, percussion, single-shot pistol patterned after the kind of handguns used by fur traders in the 1840s.
The kit sells for just under $250, and it comes in a nice package with all the parts readily visible. As I looked at it, I couldn't help but notice some similarity with the lines of an early 19th-century pistol. The Trapper has a wood spur near the top of the rear of the grip, and this reminded me of a sawhandle dueling pistol. These weren't very common, but they were distinctive.
I firmly believe that whenever you build a kit gun you should feel absolutely free to modify it in any way you desire. While you can assemble a kit into a "factory gun" with no variations from the manufacturer's design or instructions, you can also make it your own by changing sights, finish, barrel length, and so on. Instead of making a gun just like thousands of others have made with that same kit, yours can be unique and one of a kind. That was my objective.
After doing a bit of reading in The British Duelling Pistol by John A. Atkinson, I decided there were a number of modifications I would need to make to my gun. First, I would need to alter the shape of the pistol grip and grip cap. I would also want to change the sights on the pistol. The kit comes with good sights, but they are not at all similar to what you would have found on a 19th-century dueling pistol.
Fortunately, the stock of the kit gun was made of beech. It's a very plain, strong, inexpensive wood used by a lot of gun manufacturers. I had an old Savage riflestock made of the same wood, so I had plenty available to graft onto the kit gun.
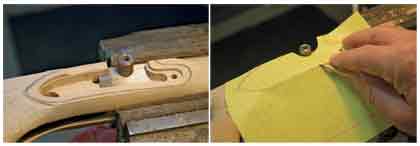
 Reid used a pasteboard template to lay out the cut he needed to make in the stock. The same template was also used to cut the wood to be spliced into the pistol's stock. |
Modifying The Stock
The first step was just to check out the parts and pieces to make sure everything was there and that everything fitted into the stock. Once I did that, I installed the barrel tang and barrel so I could get a better idea of the overall lines of the stock and pistol. I then made a simple template of pasteboard to match the cut I would make in the top of the grip where I needed to add additional wood. This template allowed me to adjust the lines where I would cut the stock before actually making any cuts. If something didn't look right, I could redraw the lines or cut a new piece of pasteboard. That's a lot easier and safer than ruining a stock.
Once I knew where I wanted to cut the stock, I used my band saw to make the initial cuts. I then used my pasteboard template to draw duplicate reference lines on the old Savage stock as guides when cutting it for the needed wood. After that, it was just a matter of using files, sandpaper, and a straight-edge to get my extra wood to fit the cut on the dueling pistol's stock.
The two pieces were then coated with epoxy and clamped together under a fair amount of pressure. I wanted the smallest seam possible once the wood was glued together. After the epoxy cured, the additional wood and the stock were shaped and contoured with a fine-cut wood rasp and files.
Shaping & Finishing The Stock
One of the characteristics of the sawhandle dueling pistol was a flat grip cap. The kit came with a massive, rounded cap, which I discarded.
Instead, I opted to use a steel grip cap originally intended for a rifle. It just happened to be the right size, and being steel, it served as a guide once it was installed as I continued to shape the pistol grip.
At various times I installed pieces of stock hardware, such as the trigger guard and nose cap, as the stock was shaped. It was important to make sure the joint between these components and the stock was both tight and level. You definitely don't want to have the surface of the wood higher than the metal or the metal higher than the wood. There was no need to worry about scratching the metal, as I later polished and finished the steel and brass components.
After shaping the stock, I assembled all the components one more time to make sure everything fit and worked together. Once that was done, I disassembled the gun and began the final sanding of the stock. I had used files extensively to reshape the stock, so a lot of sanding was needed to remove those file marks. I began with 80-grit sandpaper and worked my way up through successive grits, finishing with 220-grit sandpaper.
After sanding with each grit, I dampened the stock with a wet cloth and dried it with a hot-air gun. That raised the tiny "whiskers," or bits of wood fiber, left by the sandpaper. Some folks call this raising the grain or dewhiskering. It results in a smoother,
finer finish.
 Reid also altered the kit stock by reducing the width of the border around the lock plate. After completing the border, Reid made a tracing to use as a pattern to shape the panel on the left side of the stock. |
With the sanding completed, I used an alcohol-based stain on the beech stock. By giving the wood a dark walnut color, the stock had a much more traditional and classic look. After letting the stain set up for 24 hours, I applied several coats of tung oil. This is very similar to the traditional linseed oil finish; however, tung oil dries faster, which is kind of important to most folks who are building a kit gun. They want to get the darn thing finished and out to the range!
Working The Metal
While the stock was drying, I finished up the work on the metal. Because 19th-century sights tended to be very low and small and because the factory kit front sight was far too large, I needed to modify it. I also made a simple notch rear sight to replace the rear sight that came with the kit.
The steel parts, including the barrel and the barrel rib, were polished to 220 grit and then burnished with a wire wheel. Then the parts were cleaned with alcohol to remove any traces of oil, grease, dirt, and fingerprints. I used Birchwood Casey Plum Brown to color the steel and to give it a very traditional dark brown look. Plum Brown is easy to use. You just heat the parts with a propane torch until a drop of water sizzles when it touches the metal, and then you swab on the Plum Brown. The more Plum Brown you use, the darker the finish.
The brass parts were also polished. Since I wanted the gun to have an older, more traditional look, I opted to not have a high gloss on the brass. Instead, I went for a more subdued, dull finish to give it a little bit of an aged look.
Once the brass was completed, the pistol was reassembled. All in all, it looked pretty darn good, but there are some things in this kit I would change. I think the finger pieces on the triggers are a bit short, and the overall shape of the trigger bow is not as attractive as I would like. However, for a kit designed for someone just getting started in gunsmithing, it will do just fine. It can be a great learning experience and provide many hours of pleasure.
Until next time, good luck and good gunsmithing!
 The factory kit front sight was far too large, so Reid modified it. He also made a simple notch rear sight to replace the rear sight furnished with the kit. |
