September 23, 2010
By Reid Coffield
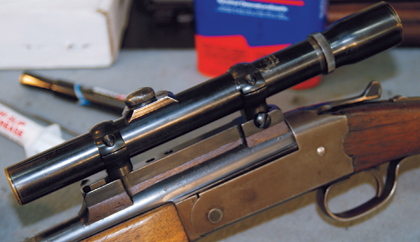 It can be quite a challenge to mount a scope on a gun for which no factory-made bases are available, such as this old Savage Model 219, but with some help from Reid, you can do the job yourself. |
When I opened my gunsmithing shop in a little town in western North Carolina years ago, I drilled and tapped a lot of guns for scope mounts. Most of them were older military rifles that had been sporterized to one degree or another. However, there were a fair number of commercial sporting rifles, both rimfire and centerfire, as well. Keep in mind that it was quite some time after World War II before virtually all manufacturers set up just about every rifle for a scope. Until then, you often saw rifles that had not been drilled and tapped for scope bases.
Generally, this was a pretty straightforward gunsmithing job with few problems. From time to time, you'd run across a receiver harder than woodpecker lips and all but impossible to drill and tap, but mechanically, that was about it. There was one other problem, and that was finding appropriate scope bases.
Advertisement
As I think back, I believe it was a bit easier back then than it is now. You can definitely make the case that it's now more difficult to locate bases for some of the stranger, less popular, and seldom-seen guns. Many scope-base manufacturers have simply had to drop some of their lines because sales were so very limited. It's awfully hard, if not impossible, to justify maintaining tooling or inventory for a scope base where you might sell only half a dozen or so units per year. Not many successful businesses can afford to do that in this day and age.
About a year or so ago, I was at a local gun show and spotted an interesting old rifle. It was a Savage Model 219 single-shot, break-open, hammerless rifle that looks a lot like an ordinary break-open, single-barrel shotgun. In fact, this rifle was available in a number of calibers ranging from .22 Hornet to .30-30 and could be ordered with an additional shotgun barrel in either 12 or 16 gauge.
Advertisement
This old Savage came with a 12-gauge barrel duct-taped to the .30-30 rifle barrel. It was in fair shape. The stock had seen a lot of use and abuse, but after a modest amount of dickering, I bought it. I have to admit I have a weakness for single-shot rifles, and at the time, I had visions of finding a .22 Hornet barrel to go with the .30-30 barrel. Unfortunately, I haven't been able to locate one yet.
I decided to go ahead and do some work on this old girl. I opened up the choke on the shotgun barrel. Originally it was Full and then some. That was way too tight for most applications, so I opened it up to Modified. I also picked up a Boyd's stock and will eventually replace both the buttstock and the forearm.
I wanted to mount an old Weaver K2.5 scope on the .30-30 barrel, but it was not drilled or tapped for a scope base. I checked my Brownells catalog and found that Weaver still offers a two-piece base for the Model 219. That's great, but I didn't want to use a Weaver base for several reasons. First and most importantly, the Weaver base would not permit any windage adjustment. If the rifle tended to shoot to the right or the left, I would have to compensate with the internal scope adjustment. I really don't like to do that. I want as much useable adjustment as possible available in my scope.
In addition, a two-piece base would necessitate drilling and tapping four holes in my rifle's barrel. I don't like to drill more holes than are absolutely necessary. I guess part of that is seeing so many guns over the years that look like Swiss cheese after someone has gotten drill-happy on 'em.
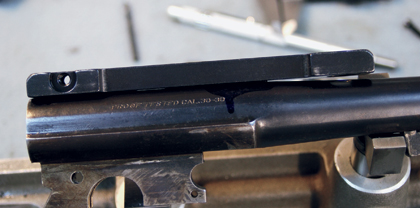 The base that Reid used on his Savage Model 219 had a flat bottom that did not match the contour of the rifle's round barrel. It also had a large space between the tapered barrel and the bottom of the scope base. The job required building a shim out of Steel Bed, but that's not quite as hard as it sounds. |
Finally, when using a one-piece base, you seldom have to worry too much about the front and rear scope rings being misaligned. If both rings are on the same base, odds are they're pretty darn close to being the same height. You can't always say that about two-piece bases.
Consequently, I opted to use a Redfield one-piece base, as it would take care of my concern about ring alignment, and it only required drilling and tapping three holes. Standard Redfield bases also allow for windage adjustment of the rear ring.
The only problem was Redfield does not offer a base for the old Savage 219. But that really wasn't a problem. A quick telephone call to the good folks at Brownells was all I needed to order everything necessary to complete my scope-mounting project. I ordered a Redfield base, some extension rings, and an Acraglas Steel Bed kit.
The base was for the Marlin 336, and I frequently use it for projects like this. The bottom of the base is flat, and it is easy to modify it to fit different contours. In fact, you can change the contour without a milling machine.
That's were the Steel Bed came into play. What I did was to make a shim, or gasket, with the Steel Bed that goes between the base and the top of the barrel. It was really easy and pretty darn fast.
 To ensure his screw holes were properly centered on the barrel, Reid used a Forster Universal Sight Mounting Fixture. Two small pieces of drill rod were used as spacers between the scope base and the top of the barrel. They will eventually be embedded in the Steel Bed shim. |
The first step was to drill and tap the barrel for the three 8-40 mounting screws. I measured the wall thickness of the barrel where the screws would be located, and there was plenty of steel. Over the years, my rule of thumb has been that at a minimum you should have your threaded hole to a depth equal to the diameter of your screw. With that much thread, I've never had a problem of screw holes stripping out. In this case, the 8-40 screw had a diameter of about 0.160 inch, and the total wall thickness above the rear of the chamber was right at 0.320 inch. The web remaining between the bottom of the screw hole and the chamber would be on the order of 0.160 inch thick, which would be plenty for my old .30-30.
To ensure the precise placement of my screw holes, I used a Forster Universal Sight Mounting Fixture. This fixture uses hardened bushings for both the drill bit and the tap, and it virtually eliminates the possibility of off-center holes, canting, or improperly threaded holes. I've had my fixture for more than 30 years, and it has been one of the best tools I ever bought.
In making a shim for the scope base, you want to make sure it's thick enough at its thinnest part. To do this, I made two small spacers from a piece of drill rod that was 0.054 inch in diameter and about 1/4 inch long. These two spacers will be laid across the barrel under the base in the Steel Bed. The bedding will completely cover these spacers, and you'll never know they're there.
One last item I needed to check was the length of my scope-base screws. The screws that came with the base were designed for the Marlin 336 where the base would mount flush to the receiver. In my situation, there's a 0.054-inch spacer, and it's important to make sure the screws are long enough to accommodate the extra height.
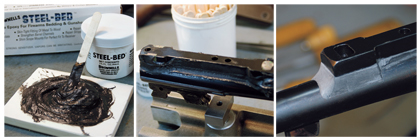 The Steel Bed was placed between the scope base and the rifle barrel, allowed to cure and harden, and then shaped and contoured. |
The base was prepared by filling the front ring-attaching hole with modeling clay and liberally coating the base with release agent. Release agent was also applied to the barrel, the attaching screws, and in the scope-base-screw holes. The Steel Bed was mixed, and a black dye was added to help it match the scope base. To give it an even darker color, I'll "paint" it with an indelible black marker when I finish. Normally, Steel Bed is gray, and I want my shim to be less obtrusive and to match the barrel and base as close as possible.
The Steel Bed was carefully applied leaving space around the screw holes. The two spacers were placed in the Steel Bed--one behind the front screw and the other near the rear screw. The base was then put in position with three screws in place. The screws were carefully inserted into the screw holes in the barrel and tightened until the base bored down against the two spacers.
I let the Steel Bed set up for about half an hour and then removed any excess. A wooden mixing stick was used to help sculpt the Steel Bed so that it had a nice flowing curve from the scope base to the barrel. I wanted the Steel Bed shim to look like it was a part of the scope mount and not an add-on.
Basically, that's all there was to it. Once the Steel Bed cured, I cleaned the base and mounted the scope. While you might never work with an oddball like my old Savage Model 219, this same technique can be used for other firearms where bases are not generally available.
It's a simple, easy, and extremely versatile procedure.
Until next time, good luck and good gunsmithing!
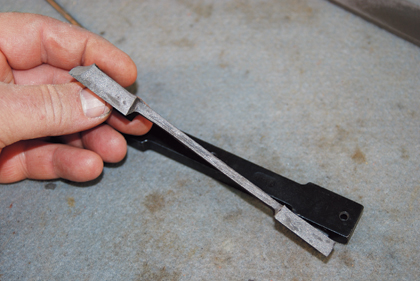 After the spacer was dressed and cleaned up, it is ready to be blackened to match the barrel and the scope base. A simple indelible marker will do the trick. |
